These Christmas Oreos are simple, impressive, no-bake treats that are absolutely adorable. There are so many creative and festive ways to design these easy cookies, it’s perfect for kids to have fun with, or to serve to a large crowd in a pinch. You are guaranteed to impress all your friends and family, and you don’t even need to touch the oven!

Reasons You’ll Love Christmas Oreos
Kid Friendly – No need to worry about your kiddos messing up the sugar cookies this year. These are just Oreos and chocolate, so they can express their creativity without causing you stress!
No Bake No Problem – If you are not participating in the great holiday bake off this year, and just want something simple but still festive, this is the perfect recipe for you.
Chocolate – Chocolate covered anything just means it’s gonna be delicious, right?
Oreos – Who doesn’t love Oreos?
Creative – You can either follow these decorative guidelines to a ‘T’ or use them as inspiration for your own Oreo decorations.
Double Up! – This recipe is really easy to double up on, especially if you’re feeding a large crowd! Just make sure you have some helping hands.

Maybe you’re looking for something new to add to your wide array of cookies this holiday season, or you just want to have some easy fun with the family before Christmas. Either way, I know you’re going to love this idea as much as you’re going to love eating them!
Ingredients and Substitutions
Recipe Discussion
Let’s discuss how to make this recipe, as well as the ingredients that are needed. Please take note that below you will find discussion, expert tips, and answers to frequently asked questions about this recipe to help you recreate it in your kitchen. If you *just* want the recipe itself, scroll down. The full printable recipe itself, with exact measurements and instructions, is found at the bottom of this page.

Depending on which Oreos you want to decorate determines which ingredients you will need. However, we will go over the basic ingredients you’ll need for most of these designs.
- Oreos – For Mr. and Mrs. Claus I used Golden Oreos, but you can use the Cinnamon Bun Oreos or Snickerdoodle Oreos (If you can find them!). You’ll need plain old Oreos too.
- Melting Chocolate – You will need dark chocolate and white chocolate if you’re copying the designs above. You will need to melt all the chocolate ahead of time in a microwave safe bowl. Follow the instructions on the package. If there are no instructions, microwave the chocolate in 30 second increments until it’s completely melted. Some of the chocolate you’ll add food coloring to, so you want to be sure you have enough to split it all up!
- Oil Based Food Coloring – Oil based food coloring is the only kind you should use when you’re coloring chocolate. Water based food coloring can cause the chocolate to seize. I used pink, red, green and blue for this recipe. You can also just buy pink, red, green and blue candy melts instead.
- Sprinkles, Candies, Frosting, and other Toppings – I will list in the instructions of each design what toppings and candies you’ll need.
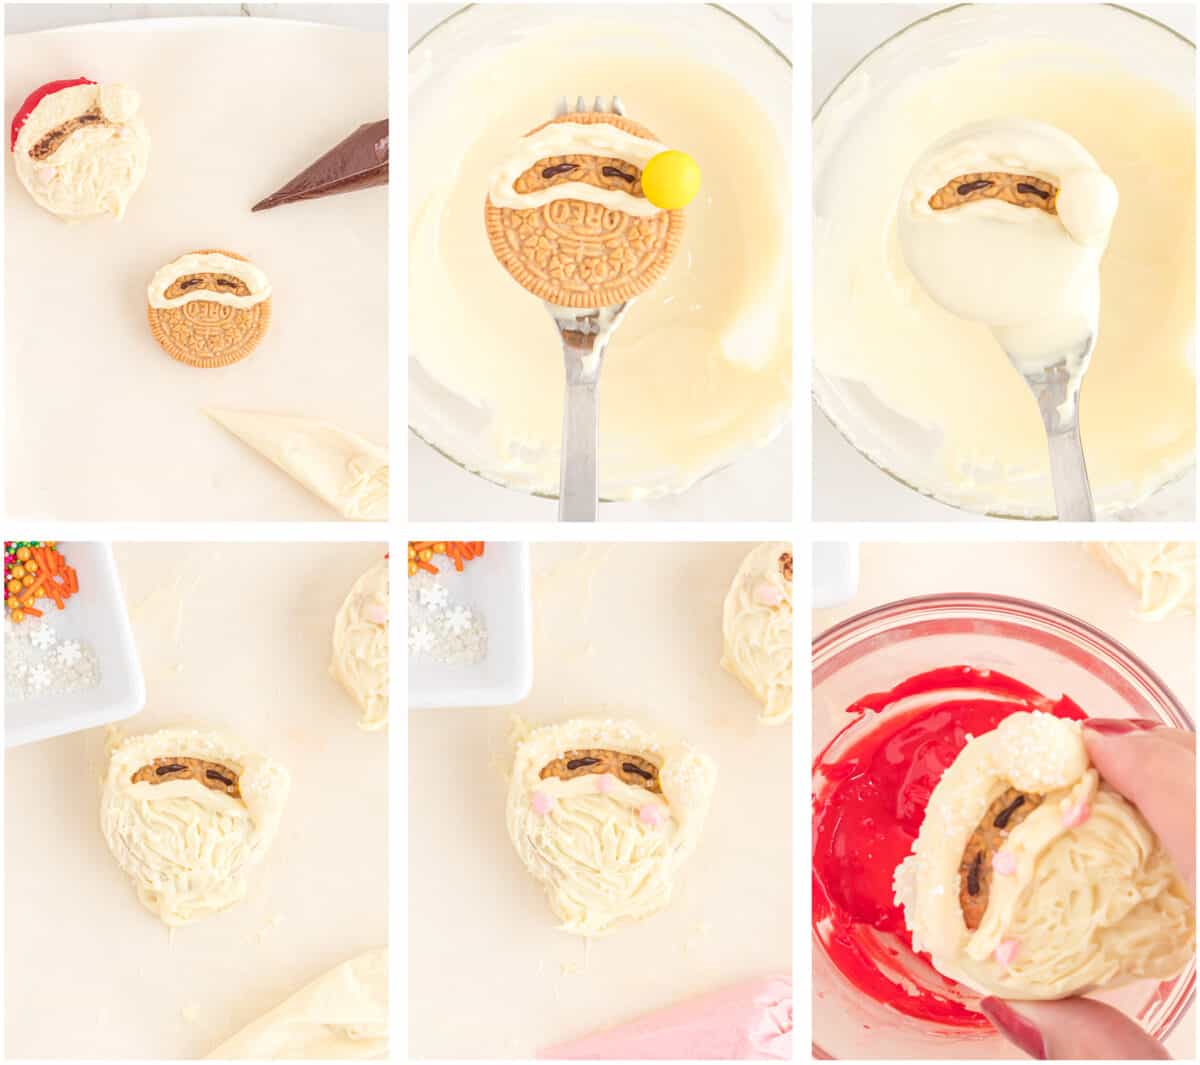
How To Make Santa Claus Oreos
Ingredients – Golden Oreos, melted white and dark chocolate, pink and red food coloring, M&Ms, white dusting sugar.
- Begin by filling a piping bag with melted white and dark Belgian chocolate. Using a Golden Oreo, pipe some dark chocolate eyes on the top of the Oreo Cookie. Using the piping bag filled with white chocolate, pipe a long oval-like shape to outline the eyes.
- Stick an M&M candy on the edge of the outline you just made. This will be for the ball at the end of Santa’s Hat. Pop this Oreo in the freezer for a few minutes to allow the chocolate to harden before moving onto the next step.
- Grab your bowl of melted white chocolate. Using a fork, dunk the Oreo in the white chocolate so it covers everything around the outline you just made for the eyes. Make sure it covers the M&M as well. Use a spoon to spoon the chocolate on the top if that helps you. Let the excess chocolate drip off and move it to a parchment lined plate.
- Before the chocolate dries, sprinkle Santa’s beard, pom pom, and the brim of his hat with white sanding sugar. Allow the chocolate to set for a few minutes, then use a fork to add some texture to Santa’s beard. Next, using the piping bag filled with white chocolate, add a mustache to Santa’s beard.
- Using a piping bag filled with white chocolate dyed pink, pipe three circles. Two for his cheeks and one for his nose.
- Allow the chocolate on this Oreo to set completely. Once it’s dry, dip the top of the Oreo into a bowl filled with melted white chocolate dyed red for the Santa hat.
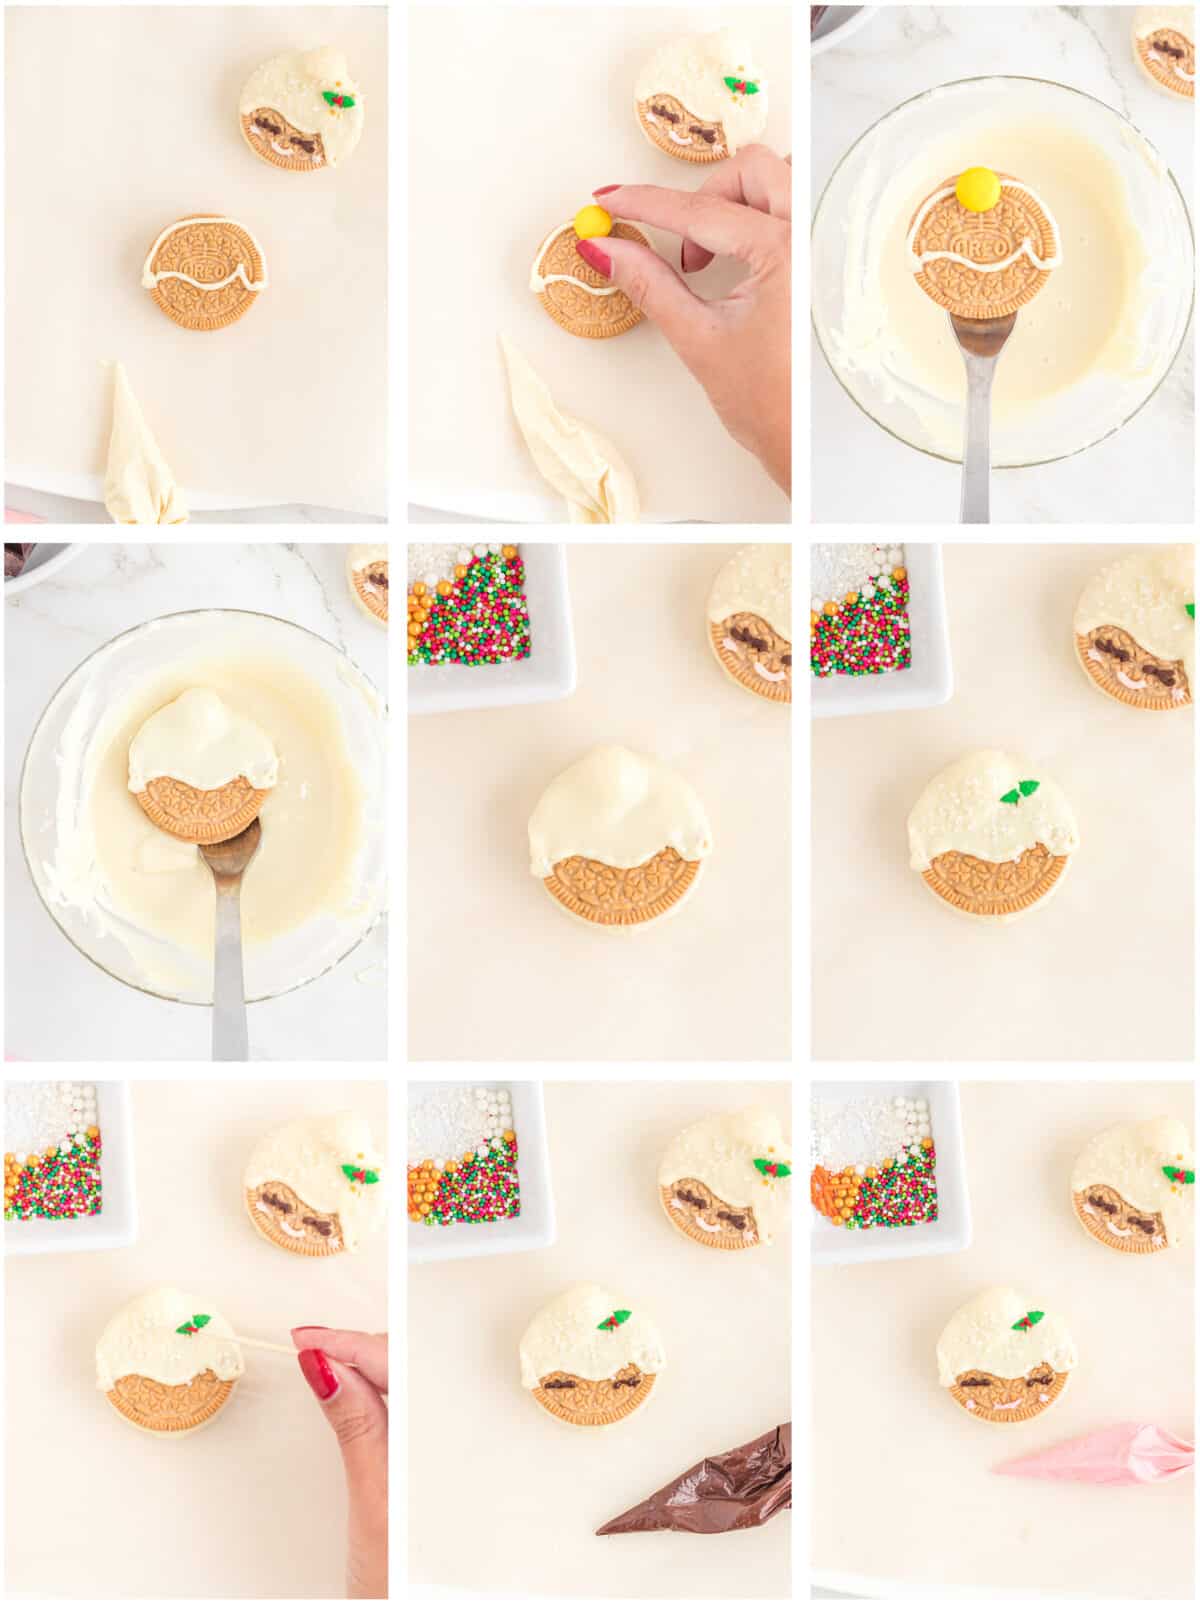
How To Make Mrs. Claus Oreos
Ingredients – Golden Oreos, melted white and dark chocolate, M&Ms, pink food coloring, white sanding sugar, red ball sprinkles, leaf shaped sprinkles.
- Begin with a Golden Oreo, and at the top of the Oreo, make an outline of Mrs. Claus’ hair using a piping bag filled with melted white chocolate.
- To the top of the outline you just made, add an M&M candy. This will represent her hair bun. Allow the cookie chill in the freezer for a few moments to let the outline set.
- In a medium sized bowl, melt the white chocolate. Using a fork, you’re going to dunk the Mrs. Claus into the white chocolate, but make sure not to cover her face.
- Cover the entire back of the Oreo and fill in the outline of her hair. Cover the M&M bun as well. Use a small spoon if it helps. Allow the excess chocolate to drip off the cookie, back into the bowl.
- While the chocolate is still wet, sprinkle Mrs. Claus’ hair with white sanding sugar.
- To the corner of her hair underneath her bun, add two leaf shaped sprinkles to represent holly leaves.
- To the center of the two leaves, add a red ball sprinkle.
- Using a piping bag filled with melted dark chocolate, pipe two lines for her eyes.
- Using a piping bag filled with melted white chocolate dyed pink, pipe a line for her smile, and two dots for her cheeks. Allow the Oreos to chill in the freezer until they’re completely set and you’re ready to serve them.
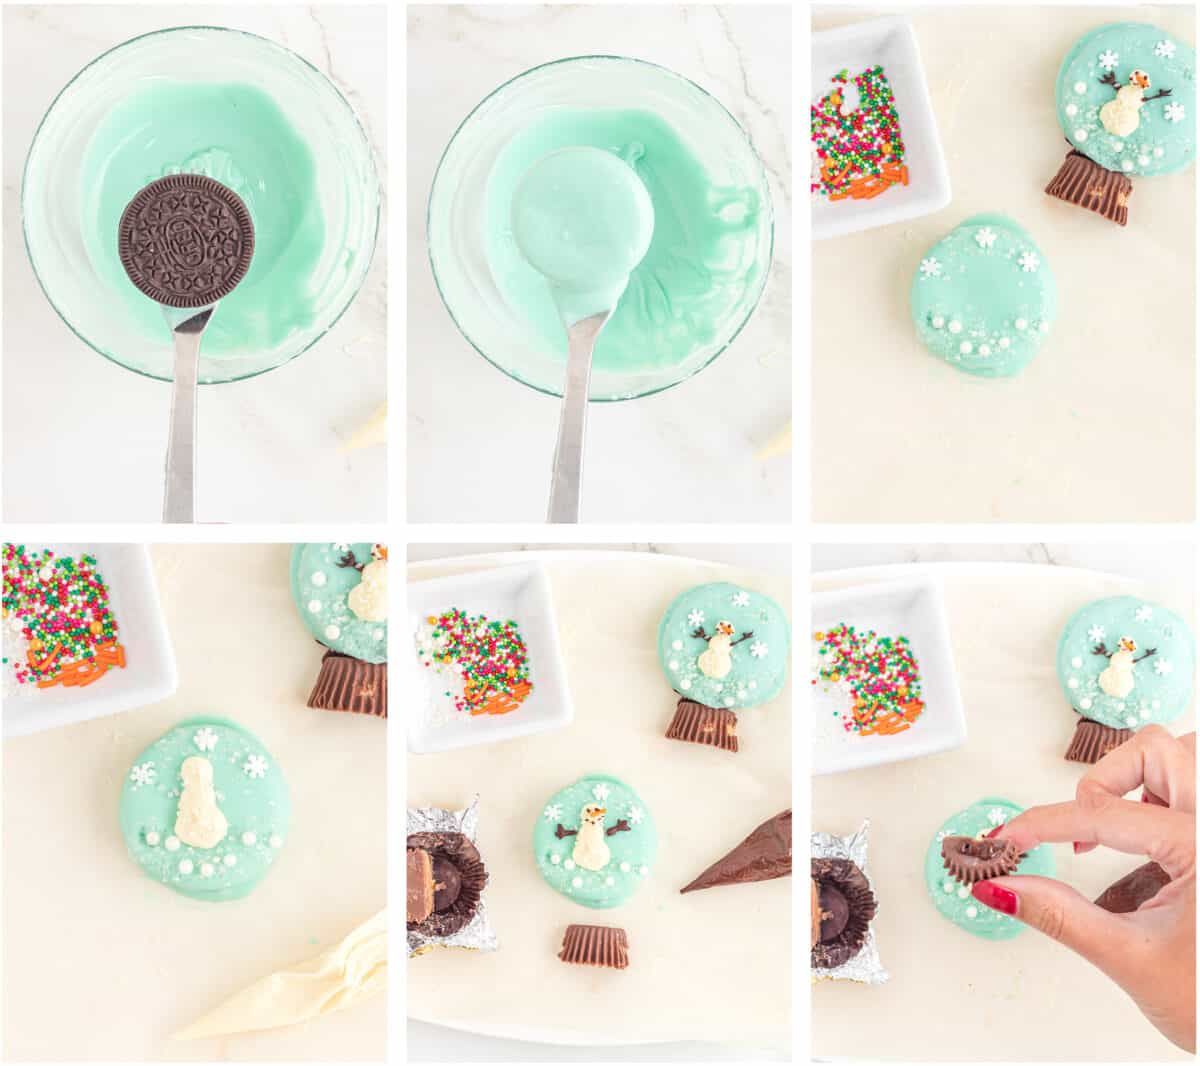
How To Make a Snow Globe Oreo

Ingredients – Oreos, melted white and dark chocolate, blue food dye, snowflake sprinkles, pearl sprinkles, white sanding sugar, orange Jimmie sprinkles, Mini Reeses Peanut Butter Cups.
- Begin by melting a bowl of white chocolate and adding blue food dye until you reach your desired color. Grab an Oreo of your choosing.
- Using a fork, dip the entire Oreo into the blue chocolate. Allow the excess chocolate to drip off the Oreo.
- While the chocolate is still wet, add the white sanding sugar, pearl sprinkles and snowflake sprinkles to the top and bottom of the Oreo saving some space in the center.
- Let the cookie cool in the freezer for a few moments until the chocolate is completely set. Using a piping bag filled with white chocolate, draw the body of a snowman in the center of the Oreo. While the chocolate is still wet, dust the body of the snowman with white sanding sugar.
- Pipe on a face, and arms to the snowman using a piping bag filled with melted dark chocolate. Use an orange sprinkle for the nose.
- Cut a mini peanut butter cup in half, and adhere the top to the bottom of the cookie using the piping bag filled with dark chocolate. Allow the cookie to set completely before serving.
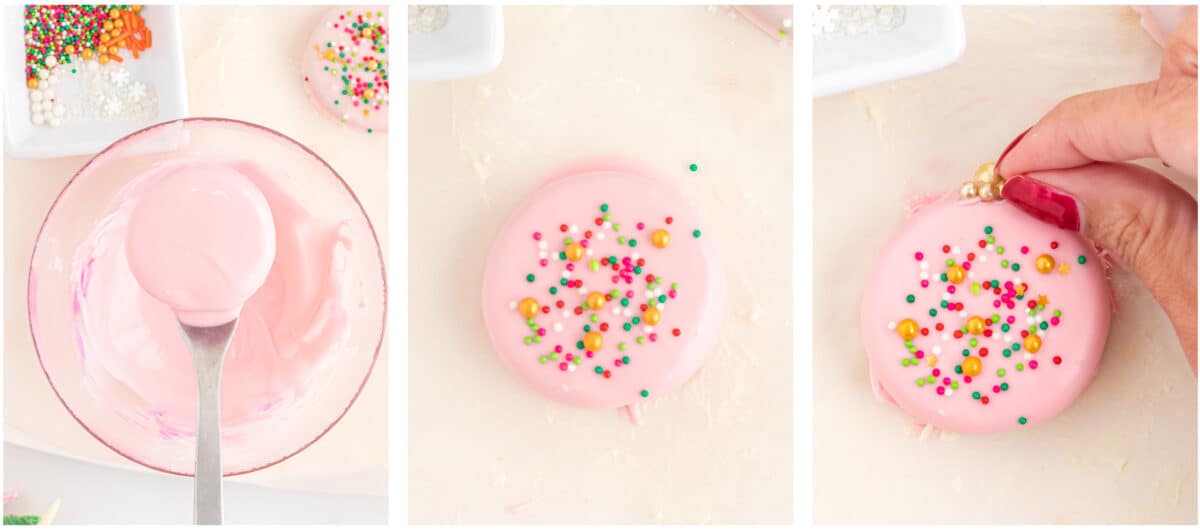
How To Make an Ornament Oreo
Ingredients – Oreos, melted white chocolate, pink food coloring, colorful sprinkles, gold ball sprinkles.
- Begin by melting a bowl of white chocolate and adding pink food dye until you reach your desired color. Dunk an Oreo cookie into the melted white chocolate using a fork and allow the excess chocolate to drip off.
- While the chocolate is still wet, add a bunch of colorful sprinkles to the center of the cookie as well as a few golden ball sprinkles.
- Add a few golden ball sprinkles to the top of the cookie to make it look like an ornament topper. Let the cookies set completely before serving.
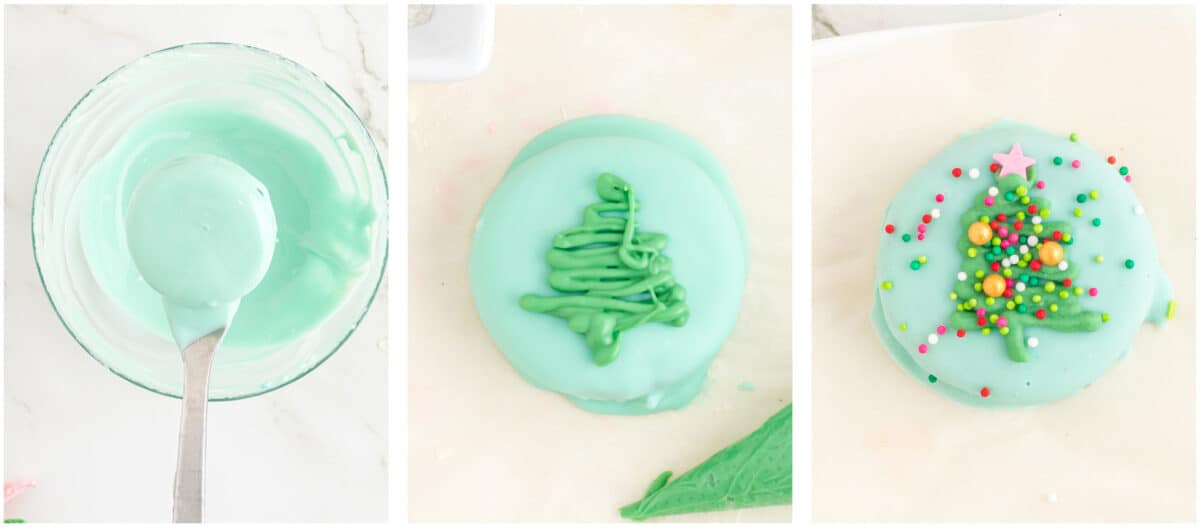
How To Make a Christmas Tree Oreo
Ingredients – Oreos, melted white chocolate, blue food coloring, green food coloring, colorful sprinkles.
- Begin by melting a bowl of white chocolate and adding the blue food coloring until you reach a desired color. Dip the entire Oreo into the chocolate using a fork and let the excess drip off. Stick the cookie in the freezer to set completely.
- Take the cooled cookie out of the freezer and use a piping bag filled with melted white chocolate dyed green to pipe on a Christmas tree into the center of the cookie.
- White the green chocolate is still wet, garnish the tree with colorful sprinkles, and add an optional star sprinkle to the top of the tree. Allow the cookie to set completely before serving.
Recipe Tips and Advice
Storage – Store these in an airtight container for up to 2 weeks. Make sure not to store them in the fridge otherwise the cookies will sweat and the designs will run.
Equipment – For this recipe you will need piping bags, parchment paper, microwave safe bowls and forks. If you hate working with small ingredients, you can use food tweezers or toothpicks for those small sprinkles.
Working with chocolate
Be careful not to overheat the chocolate when melting it. Remember to microwave chocolate in 30 second increments and stir each time in between. You can melt the chocolate over a double boiler if preferred. Also, to make sure the piping bags filled with melted chocolate don’t harden on you while you work, you can set a plate over a bowl of warm water, and set the piping bags on the plate.

Recipe FAQs
Using a fork, or any utensil of choice, really helps with the dipping process. Using your hands and fingers can make it messy and hard to work with.
Nope! Since we are using chocolate for the “frosting” the Oreos shouldn’t get soggy.

More Christmas Recipes to Try
Tis the season for treat making! Try out a few more delightful, fun and festive recipes this holiday season.
- Chocolate Covered Ritz Crackers
- Oreo Truffle Recipe
- Peppermint Oreo Bark
- Oreo Truffle Trees and Santa Hats
- Easy Christmas Pretzels



Leave a Reply