
For over a year, I wanted to make Bakerella’s cupcake cake pops. I’d look at them online, read about them, think about them, but frankly – I was intimidated by them. Finally a few weeks ago I gave them a try. One word. FAIL. I’m not sure what I did wrong, but they were just blobs. They tasted great, but were not very cute. A few days later I came across My Little Cupcake’s Cake Pop Mold. I figured for $5.95, plus shipping, I could take a risk and try it out.

Guess what??? It worked! Wonderfully! They have a GREAT tutorial video on the front page of their website. I watched it and figured if her kids can do it, I could do it (or at least I should try to). I used the No Bake recipe on her site (which happens to be my favorite Oreo truffle recipe – I’ve been known to attend Pampered Chef parties simply because I know they often serve the Oreo truffles). I like cake pops, but I LOVE the Oreo truffles. Let’s walk through how to do this…

Ingredients are quite simple, Oreos, cream cheese, melting chocolate, M&Ms and sprinkles. You’ll also need sticks and having an empty egg carton ready will come in handy. To make a full batch, you will use the entire bag of Oreos and entire block of cream cheese. Now, having said that, I almost always cut back on the cream cheese. For this batch I used half the bag of Oreos and 1/3 the block of cream cheese.

Take the Oreos for a spin in the food processor.

Poor the crumbs into a bowl. Add your cream cheese.

Ready to get your hands dirty? Mix that cream cheese in by hand. It’s gooey and messy and you have to work it for a bit, but eventually you will get this…

Resist eating the giant ball of Oreo truffle dough. It’s hard, I know.

Roll the dough by hand into 1″ balls. I tended to make mine too small, they needed to be a decent size. Almost the size of a golf ball. The first few I made weren’t big enough, and I had to redo them. After making the Oreo balls, put them in the fridge for at least ten minutes.

Now you will want to take your ball of dough and put it into the cupcake pop mold. I found it best to not try and squish it in, but let the mold do the work when you close it.

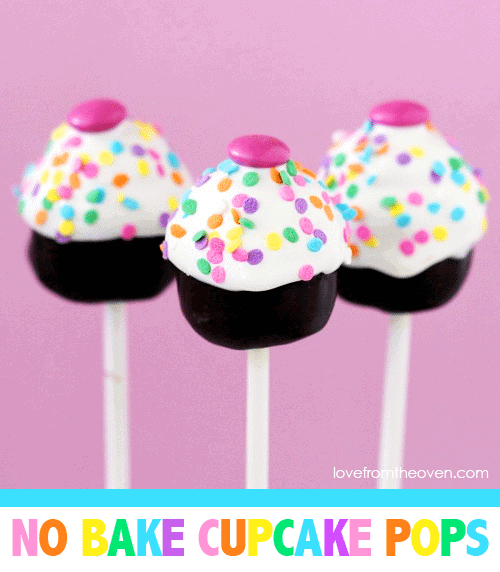
Wipe off any excess. And with a little luck, you will have a super cute little cupcake!

Aww, aren’t they cute? Now stick them in the fridge for at least ten more minutes. Before pulling them out of the fridge, go ahead and melt your chocolate according to the package directions.

Dip the bottom part of the cake pop into the chocolate.

After dipping the bottom in chocolate, insert your stick. This is where your egg carton will come in handy, as it makes a wonderful cupcake pop holding area.

After the chocolate has set, melt your second chocolate color so you can dip the tops into it.

Let the excess drip off, turn over and top with an M&M and then sprinkles of your choice.

And then let set. I used a block of styrofoam from Walmart to put mine in.

How freaking cute are those????? Thumbs up to My Little Cupcake for their amazing product!

I put mine into a yellow bucket from the Target dollar section. You can use styrofoam in it, but I actually used dried beans to hold mine in place. Easter grass hides so much!

Love them! Hopefully the sweet birthday girl who I made them for will enjoy them.


Christi says
The great mold is from My Little Cupcake – http://www.mylittlecupcakepop.com/
Seriously, I love this thing. It was really easy. While I’m not glad to hear that others struggled with trying to make the Bakerella cupcake pops (okay, maybe a little – because I kept thinking she makes it look SO easy!!!), I love this option.
I will also add that I SOOO prefer the Oreo truffle recipe versus the cake and frosting. I prefer the taste, I prefer the consistency, and just find it a bit easier to work with, for me personally.
Though I will ALWAYS support the eating of extra/leftover/failure cake pop dough. I just want to be clear on that. 🙂
I’d love to hear how others do with the mold. I honestly wasn’t expecting much after my epic fails, so I was so happily surprised. The girl I made them for was thrilled. Yay!
j salinas says
May I ask where did you find the mold for the cupcake pops? They are so cute, I just made some without the mold and they are not as cute.
susie says
these really are cute, and I too had the epic fail with cake pops….I decided to move on and let them be, but you have spiked my interest….
Mardi@eatlivetravelwrite says
I just bought this mold thanks to this post! Cake pops are on my list in the next few weeks and I was wondering how to make the shape properly without having to have a bunch of ruined dough (that I would then have to eat!). Thank you – I hope mine turn out as well as yours!
Kathy in Greendale says
I made Bakerella’s recipe today and….FAIL for me also. I love the cupcake mold but I think I need to try the Oreo no bake recipe, or less frosting in Bakerella’s recipe (although, I did exactly as she suggested).
Rosie says
Wow, those are absolutely adorable!!! Using a mold seems much less intimidating than the cookie cutter method!!
Squash Blossom Babies says
Awww…these are so cute!
Happy When Not Hungry says
How cute! I definitely need to get myself a mold like that. What a great idea and they look delicious too!
Angel says
I’m wanting to get one of those molds when the new version comes out in a couple of months. I’ve made cake pops numerous times, and so many times I’ve gotten frustrated and said, “NEVER AGAIN!” But Bakerella does it ALL the time, so I figure it must get better with practice….. I hope. Mostly, I’m just glad I saw this because of your cute little Target bucket. I’ve seen some really cute ones there but always pass them up because I have no real use for them. Now I do!
Katrina @ In Katrina's Kitchen says
Wow! I love it! So worth the $5.95 to to have to cut everything and smoosh it and still have a blog. Bakerella is good – me? Not so much! SO CUTE!! ♥-K