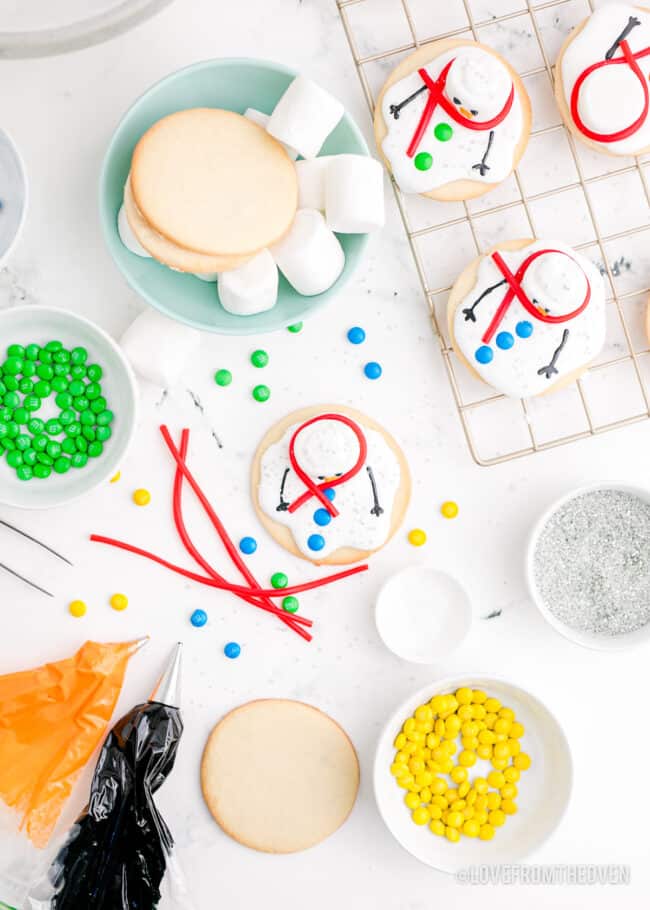
Melted Snowman Cookies are an adorably sweet treat for the holiday season. Buttery sugar cookies are topped with a simple royal icing and decorated to look like darling little snowmen. These impressive treats are actually quite easy to make. Get ready for wide eyes and big smiles when these happy little Christmas Cookies are shared with friends and family.

Reasons You’ll Love This Recipe
When it comes to cute cookies, these sweet little snowmen are hard to beat!
While they may look complicated, when you break the steps down they are actually quite easy to make.
They look absolutely adorable on holiday dessert trays.
If you are looking for something festive and fun for a cookie exchange, these melted snowman cookies.

Melted Snowman Cookies
When the weather outside is frightful, these cookies are absolutely delightful! These cute little melted snowman cookies showed up on the internet a few years ago, and I figured it was time I get around to making them to share with you. While they take a few steps to make, these little guys are actually simple to make when you break it down. Even if you don’t have any experience decorating cookies, you can successfully make a batch of these cookies to share with your friends and family.

How To Make Melted Snowman Cookies
Let’s discuss the ingredients you’ll need, and the steps you’ll take, to make these fun little melted snowman cookies. If you want to skip my discussion, tips and answers to frequently asked questions, just scroll to the bottom for the printable recipe.
Ingredients
- Butter – While I personally prefer salted butter, unsalted will work fine.
- Granulated sugar – Your day to day white sugar.
- Egg – Make sure it’s a large egg and if you can have it at room temperature, that’s great.
- Milk – Whatever milk you keep on hand will work in this recipe.
- Vanilla extract – Pure vanilla extract is always the best option.
- Flour – All-purpose flour works best. When measuring flour, make sure to give the flour a quick stir with a spoon to aerate. Measure by spooning flour into the measuring cup, then leveling. Do not measure by scooping the flour with the measuring cup. This will result in too much flour, which can lead to dry cookies.
- Baking powder – Make sure your baking powder hasn’t expired.
- Salt – Kosher or table salt.
- Powdered sugar – Also called confectioners sugar.
- Meringue powder – This is the one ingredient you might not have on hand. I usually find mine at Walmart or order it online. It’s used to help create the royal icing on these cookies, which dries firm to the touch. To learn almost everything you could want to know about it, check out this Meringue Powder article from Wilton.
- Warm water
- Marshmallows
- Gel coloring – I highly recommend gel coloring versus liquid food coloring in this recipe.
- Candy for decorating – M&Ms (full size or mini), licorice, sprinkles – whatever you like.

Substitutions
Chill Out… or not – Use my Cut Out Cookies recipe for the cookies instead.
Semi-Homemade Option – If you need a shortcut, you have a few options. You could use a pre-made sugar cookie dough or many grocery store bakeries sell undecorated sugar cookies, you just have to ask.
Meringue Powder – If you can’t find or order meringue powder, you can try my faux-royal icing recipe. You might need to make it a bit thicker than that recipe calls for.
Write On! – If desired you can skip making the orange and black royal icing, and use food safe markers to draw on the eyes, arms and nose. Just make sure you press gently and wait until the icing has fully set, approximately two hours, prior to drawing on the cookies.
Directions
Cookies
- Preheat the oven to 375 degrees.
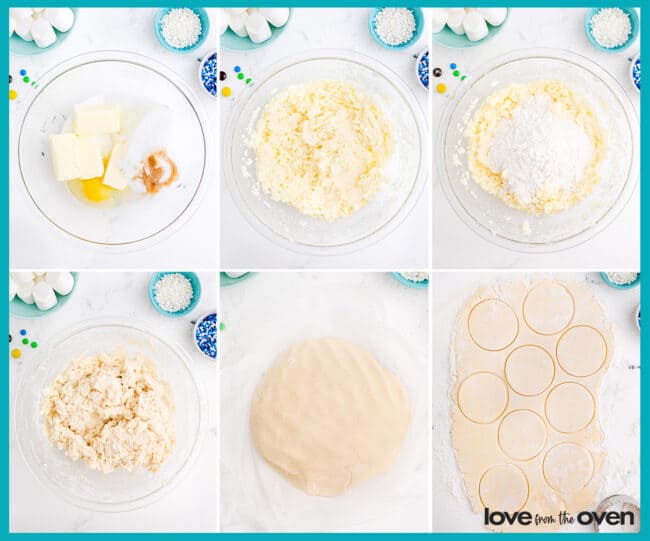
- In a medium bowl, beat butter, sugar, egg, milk and vanilla. Next, add 2 cups of flour, baking powder, and salt. Beat until well blended. If the dough is still really sticky you may add in another ¼ to ½ cup of flour.
- Divide the cookie dough into 2 equal size portions. Wrap each in plastic wrap and place them in the refrigerator for 1 hour, or until firm.
- Remove dough from refrigerator and allow to come to room temperature or until soft enough to roll easily.
- On a lightly floured surface, roll dough to ¼ inch thick.
- Using a 2 ½ inch, lightly floured cookie cutter, cut out as many cookies as possible. Remaining dough pieces can be gathered together and rolled back out to cut additional cookies.
- Place the cookies 2 inches apart on an ungreased baking sheets.
- Bake for 7-10 minutes or until the edges are just golden. These cookies can cook quickly, so start checking at the 5 minute mark.
- When the cookies are removed from the oven, place baking sheets on cooling racks to allow them to cool completely prior to decorating.
Icing
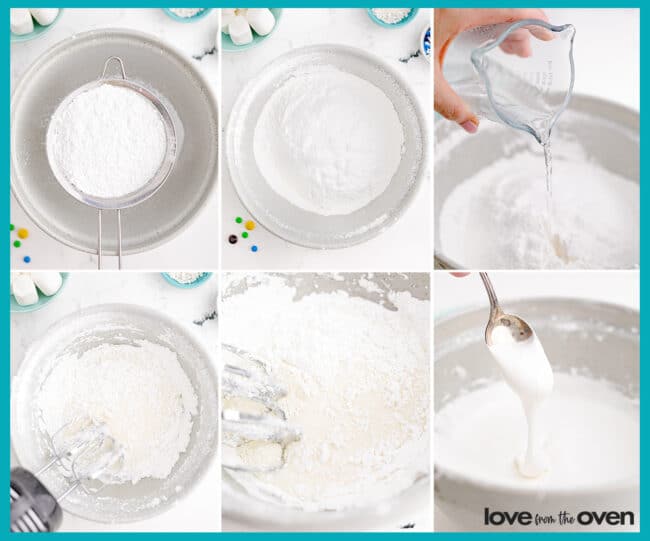
- In a large, clean and grease-free mixing bowl, sift together the powdered sugar and meringue powder. Add 5 tablespoons of the warm water. Using an electric mixer, beat on high power for 10 minutes.
- Check the consistency. You want the consistency of icing to be thick, but still has the ability to move and slide on the cookie just a little bit. If the icing is too thick and will barely move, add a few drops of water and mix well. If it is too thin beat longer, as it thickens the longer you beat it.
Decorating
- Drop a dollop of icing onto the middle of a cookie and carefully spread out towards the edges. Some icing might slowly run off the side, that’s ok – they are melting snowmen! However if it quickly runs off, the icing may be too thin. If so go back to mixing a bit more.
- Immediately place one marshmallow on the cookie for the head of the snowman and very gently press into the icing. Carefully add M&M candies for buttons. Take care to not smudge the icing as is will be soft. Repeat with remaining cookies.
- When you are ready to add the eyes and buttons, scoop out some of the remaining icing and place in a small bowl. Add some black gel coloring to the icing, place into a piping bag and pipe on arms and eyes. Repeat the process with orange food coloring to create a carrot nose. Finally, add a piece of licorice for the scarf and/or some sprinkles for fun!
- Allow icing to fully dry, which takes approximately 2 hours. Placing them in the refrigerator can help speed this up if needed.

Tips and Frequently Asked Questions
Storage: Cookies can be stored at room temperature in an airtight container for five days. Cookies can be frozen for up to three months.
Icing not coming together? It is critical that the bowl, and all equipment that will touch the icing, is free from any oils or grease, for this icing to come together as intended.
Flavoring the icing: Royal icing isn’t the most flavorful icing out there, so feel free to add a few drops of extract to it, such as vanilla, peppermint, almond or lemon. Take note, this can impact the bright white color, so if you are using vanilla, I highly recommend using a clear vanilla.
Piping: For piping the eyes, arms and nose onto each snowman, I like to use a piping bag and a Wilton #2 Tip. If you do not have those available, you can use a plastic sandwich bag and just clip off the teeny tiniest bit of one of the bottom corners and pipe through it.

More Recipes To Try
If you enjoyed this Christmas Cookie recipe, here are some other recipes I think you’ll enjoy!
- Hot Chocolate Cookies
- Christmas Tree Sugar Cookies
- Stacked Christmas Tree Cookies
- Snowball Cookie Recipe
- Soft Gingerbread Cookies
- Eggnog Cookies
- Peppermint Bark Cookies
- Chocolate M&M Cookies

I love to hear from readers like you! If you’ve tried this, please leave a comment and review below. If you have photos, tag me @lovefromtheoven #lftorecipes on Instagram and Pinterest. Thanks!

Melted Snowman Cookies
Ingredients
Cookies
- 1/2 cup butter softened
- 1 cup granulated sugar
- 1 large egg
- 2 to 3 tablespoons milk
- 1 1/2 teaspoons vanilla extract
- 2 cups all-purpose flour
- 2 teaspoons baking powder
- 1/4 teaspoon salt
Royal Icing
- 4 cups powdered sugar
- 3 tablespoons meringue powder
- 7 tablespoons warm water
Decorations
- 30 marshmallows
- gel food coloring in orange and black
- assorted candies for decorating
Instructions
- In a medium bowl, beat butter, sugar, egg, milk and vanilla. Next, add 2 cups of flour, baking powder, and salt. Beat until well blended. If the dough is still really sticky you may add in another ¼ to ½ cup of flour.
- Divide the cookie dough into 2 equal size portions. Wrap each in plastic wrap and place them in the refrigerator for 1 hour, or until firm.
- When ready to bake, preheat the oven to 375 degrees. Remove dough from refrigerator and allow to come to room temperature or until soft enough to roll easily.
- On a lightly floured surface, roll dough to ¼ inch thick. Using a 2 ½ inch, lightly floured cookie cutter, cut out as many cookies as possible. Remaining dough pieces can be gathered together and rolled back out to cut additional cookies.Place the cookies 2 inches apart on an ungreased baking sheets.
- Bake for 7-10 minutes or until the edges are just golden. These cookies can cook quickly, so start checking at the 5 minute mark. When the cookies are removed from the oven, place baking sheets on cooling racks to allow them to cool completely prior to decorating.
Icing
- In a large, clean and grease-free mixing bowl, sift together the powdered sugar and meringue powder. Add 5 tablespoons of the warm water. Using an electric mixer, beat on high power for 10 minutes.
- Check the consistency. You want the consistency of icing to be thick, but still has the ability to move and slide on the cookie just a little bit. If the icing is too thick and will barely move, add a few drops of water and mix well. If it is too thin beat longer, as it thickens the longer you beat it.
Decorating
- Drop a dollop of icing onto the middle of a cookie and carefully spread out towards the edges. Some icing might slowly run off the side, that’s ok – they are melting snowmen! However if it quickly runs off, the icing may be too thin. If so go back to mixing a bit more.
- Immediately place one marshmallow on the cookie for the head of the snowman and very gently press into the icing. Carefully add M&M candies for buttons. Take care to not smudge the icing as is will be soft. Repeat with remaining cookies.
- When you are ready to add the eyes and buttons, scoop out some of the remaining icing and place in a small bowl. Add some black gel coloring to the icing, place into a piping bag and pipe on arms and eyes. Repeat the process with orange food coloring to create a carrot nose.
- Finally, add a piece of licorice for the scarf and/or some sprinkles for fun!Allow icing to fully dry, which takes approximately 2 hours. Placing them in the refrigerator can help speed this up if needed.
Notes
Nutrition
Disclaimer
Nutrition information is estimated as a courtesy. If using for medical purposes, please verify information using your own nutritional calculator. Percent Daily Values are based on a 2000 calorie diet.


Leave a Reply